

 |
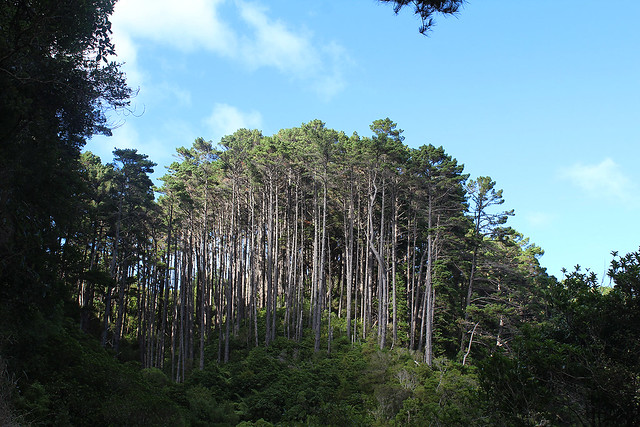
What You'll Be Creating |
In this tutorial I'll show you how to create a fantasy fairy photo manipulation. You will learn how to build a colorful flowery background, retouch a model, adjust colors, create lighting effects, enhance the depth of field, and more.
Tutorial Assets
The following assets were used during the production of this tutorial:
1. Build the Background
Step 1
Create a new 2000 x 2000 px document in Photoshop with these settings:

Step 2
Open the flower background image. Drag this image into the white canvas using the Move Tool (V).

Step 3
We need a blurred background to focus on the model. Go to Filter > Blur > Gaussian Blur and set the Radius to 60 px (or your desired values).

Step 4
Cut out the flowers branches 1 using the Magic Wand Tool (W) and place it on the left side of the background.

Step 5
Apply a Gaussian Blur of 12 px to this layer. The second blurred element will enhance the depth of the scene.

Step 6
Go to Layer > New Adjustment Layer > Hue/Saturation and change the Hue value to 49:

Step 7
Create a Curves adjustment layer and set it as Clipping Mask to darken the branches a little. On this layer mask, use a soft round brush with black color (soft black brush) to clean the effect on the front of the branches where they are lit. We're aiming to add the main light source to the right side.

Step 8
Make a Color Balance adjustment layer on top of the layers. Change the Midtones settings:

Step 9
Create a Curves adjustment layer to make the light on the right stronger. Paint on the left so that it's not affected by this adjustment layer.

2. Add the Model
Step 1
Isolate the model from the background using a layer mask (but feel free to use your own method). Move the extracted model on a new layer. Create a new layer and pick a dark gold color from the model's head (I've chosen #6a3017) and paint the missing hair.

Step 2
Use a lighter color (#b06030) to paint the hair on the edges of the head.

Step 3
Hide the background and the fill layer, and then press Control-Shift-Alt-E to merge the isolated model and the hair layers into a new one. Place the merged model in the middle of the blurred background.

Step 4
Make a Curves adjustment layer to increase the light and contrast of the model. The light on the model comes from the right and is more visible on the upper body. On this layer mask, use a soft black brush to refine the light and shadow on the model, making the light stronger on the shoulder, cheeks, and hair. You can see the results on the mask and on the picture:

Step 5
Use another Curves adjustment layer to increase the light for the model. Paint on the lower body and the left of the model in order not to make them brighter after using this adjustment layer.

Step 6
Create a new layer, change the mode to Overlay 100%, and fill with 50% gray:

Select the Dodge and Burn Tool (O) to paint more highlight and shadow for the model, especially the hair. You can see how I did it with Normal mode and the result with Overlay mode:

Step 7
You can see the following areas of the model's skin look a bit less saturated than the others. To fix it, make a new layer and use a soft brush with the color #aa784b to paint on these areas and change the layer mode to Color 100%:

3. Add the Wings
Step 1
Open the butterfly 1 image. Select the wings only and place them onto the model's back.

Step 2
Add a mask to this layer. Hold down Control and click the model's thumbnail layer to load her selection.

Use a soft black brush to reveal the hair and make it cover the wings. Also blend the lower part of the wings with the model's back.

Step 3
Create a Curves adjustment layer to make the wings brighter. Paint on the lower area to make it a bit darker than the rest.

4. Add the Branches
Step 1
Open the flowers branches 2 image. Use the Lasso Tool (L) to select the branches and add them to the right corner of the canvas.

Step 2
Apply a Gaussian Blur of 8 px to the branches:

Step 3
Change the color of the branches using a Color Balance adjustment layer:

Step 4
Use a Curves adjustment layer to brighten the branches:

5. Add the Butterfly
Step 1
Open the butterfly 2 image. Take the blue butterfly on the top left and place it onto the model's shoulder to match the direction of her gaze.

Step 2
To make a shadow for the butterfly, create a new layer under the butterfly one. Use the Polygonal Lasso Tool to select the left wing of the butterfly and fill the selection with black. Flip it vertically by choosing Edit > Transform > Flip Vertical. Use the Free Transform Tool (Control-T) to stretch this shadow, making it longer than the original.

Lower the opacity of this layer to 40% and use a layer mask to reduce the shadow's intensity. Apply a Gaussian Bur of 4 px to this layer:

Step 3
Use the same method to make a shadow for the second wing of the butterfly. Also use a medium-soft black brush with a small size to paint the shadow below the butterfly's body.

Step 4
Add a Hue/Saturation adjustment layer to change the butterfly's color:

Step 5
Continue changing the butterfly's color with a Color Balance adjustment layer:

Step 6
Use a Curves adjustment layer to brighten the butterfly. Brush on the lower part of the butterfly to make it a bit darker than the higher part:

6. The Basic Adjustment
Step 1
Create a Color Fill layer on top of the layers and pick the color #1b0126. Change this layer mode to Exclusion 100%.

Step 2
Make a Color Balance adjustment layer and change the Midtones and Highlights settings:

Step 3
Use a Curves adjustment layer to change the color and contrast of the scene:

7. Paint the Hair Highlight
Make a new layer and pick a bright yellow color for the brush (I've chosen #fff08d) and paint the hair highlight strands.

8. Add the Bokeh and Light
Step 1
Import the bokeh image into our working document and change the mode to Screen 100%:

Step 2
Apply a Gaussian Blur of 25 px and use a layer mask to erase the effect on the model's body, making the effect appear very subtle:

Step 3
Open the light texture images pack. Choose the starry 4 image and place it onto the main canvas. Change this layer mode to Screen 100%:

Step 4
Use a layer mask to erase the light spots on the left and on the model's face.

Step 5
Create a Curves adjustment layer to darken the effect, making it more subtle.

Step 6
Use a Hue/Saturation adjustment layer to change the light color to yellow:

Step 7
Create a new layer and press Control-G to make a group for this layer. Change this group mode to Color Dodge 100%. Change the foreground to #f3cf85 and hit F5 to change the settings for the brush:

Paint the small dots around the model, avoiding the face.

Step 8
To add glow to these dots, double click this layer and choose Outer Glow. Pick #fcfcfc as the color of the glow:

Step 9
Make a new layer within this group. Use a large brush to paint some bigger dots on the bottom and top right of the picture. Apply a Gaussian Blur of 25 px to these dots.

Congratulations, You're Done!
I hope that you've learned something useful for your future projects. Feel free to leave your comments in the box below—I'd love to see them. Enjoy Photoshopping!
How to Create a Fantasy Fairy Photo Manipulation With Adobe Photoshop
 Reviewed by Aracelli Muñoz Baldi
on
11:19:00 PM
Rating:
Reviewed by Aracelli Muñoz Baldi
on
11:19:00 PM
Rating:
Reviewed by Aracelli Muñoz Baldi
on
11:19:00 PM
Rating:


No comments:
¿Qué te parece este artículo?